
Closing Updated on September 28, 2023
Come uncover methods to create a pure fall garland using wax-dipped leaves! It’s a fulfilling, simple and sustainable autumn craft enterprise that the complete family can benefit from (with supervision all through the scorching wax part of course). Wax leaf garlands may very well be hung wherever, though they offer the impression of being notably beautiful strung all through a sunny window, fireplace mantle, stairwell banister or maybe a porch railing.
Making fall leaf garlands is a unbelievable choice to have a great time the altering seasons and produce just a bit piece of the great outdoors inside to benefit from, an identical to dried citrus garlands! Notably proper right here on the Central Coast of California the place the seasons don’t change very dramatically, our vibrant leaf garlands convey me loads pleasure. They really enhance the autumn vibes. This moreover gave us the suitable excuse to get outside and go to our native park to forage for basically probably the most beautiful leaves.
RELATED: Looking for additional fall craft initiatives? Uncover methods to make a DIY grapevine wreath, beautiful dried flower candle jar lanterns, do-it-yourself dried orange garland, or botanical pressed flower pumpkins!

Disclosure: Homestead and Chill is reader-supported. Everytime you purchase by hyperlinks on our website online, we might earn an affiliate charge.
Offers Needed
- Leaves. The additional vivid and vibrant, the upper! Don’t be afraid to mix quite a few sizes and styles.
- Beeswax (or vegan wax totally different). The amount wished will rely in your dipping pot and what variety of leaves you’ll have. You’ll needn’t lower than ¼ to ½” of wax throughout the bottom of the pan after melting. About ½ cup to 1 cup of beeswax pastilles must be tons. You can always soften additional!
- A double boiler* See notes beneath.
- Parchment paper or wax paper
- Jute twine, string, or totally different comparable supplies to carry the leaves from. A string of twinkle lights can create a ravishing wax leaf garland too!
- Optionally obtainable: Petite clothespins or clips to connect the leaves to the garland. I like using them on account of it makes it SO simple to attach and alter the leaves, plus the pins themselves are literally cute! However when your string is okay enough, it’s possible you’ll as nicely tie it instantly throughout the leaf stems.

Double Boiler Notes
It’s biggest to heat beeswax by way of a double boiler considerably than in a single pan instantly on the vary on account of beeswax may be very flammable. It’ll in all probability smoke and really catch fireplace if it is going to get too scorching, similar to grease! To create your private double boiler, choose a smaller pot, pan, or glass bowl which will rest on excessive or or partially nestle contained within the lower pot of boiling water (nonetheless not match completely inside, you don’t want it resting on the underside of the lower pot).
Since it could be a bit messy to clean up, a few of us use an outdated or devoted pan for beeswax. We don’t uncover that important though! For easy clean-up, merely re-heat the pot of beeswax, pour off any leftover wax to keep away from losing for an extra enterprise, wipe out the pot or pan with a paper towel, then wash properly with cleansing cleaning soap and scorching water (use the latest water from the double boiler!).

Recommendations for achievement
It’s truly straightforward and simple to make a fall leaf garland. Cliff notes: dip leaves in wax and maintain. Lol! Nonetheless listed below are just some solutions that may make points even easier and create basically probably the most beautiful, long-lasting beeswax leaf garland attainable:
- Use fallen, flat leaves. For the proper outcomes, collect leaves which have naturally fallen off the tree already. They’ll usually embrace a lot much less moisture than these plucked modern from the tree and defend larger in wax. Collect fairly flat leaves considerably than ones that are already beginning to curve, and stay away from leaves that are crispy and dry.
- Press the collected leaves in a e-book for 24 to 48 hours sooner than you make your garland (nonetheless not for for much longer or they’ll start to lose color). Flattened leaves are far easier to dip in wax, will dry additional flat, and the coating of wax will in all probability be additional even. Try to keep up the stems laying fairly straight and away from the leaf whereas pressing. Add weight on excessive of the e-book as wished.
- Preserve the wax warmth, nonetheless not piping scorching. Great-hot wax can wilt or “put together dinner” the leaves, so after melting, take away the latest wax from the heat and let it sit for a pair minutes to sit back merely barely. Nonetheless use it sooner than it is going to get too cool! As a result of the wax cools, it ought to start to re-solidify and dry additional thick and chunky (a lot much less clear) on the leaves. If you happen to occur to’re dipping an entire lot of leaves, chances are high you will should reheat the wax just a few occasions while you’re employed.
- Dip the stems too! Dipping the leaf stems in wax helps to completely seal the leaves, larger defend their color, and make the wax leaf garland final extra.

Instructions to Make a Wax Leaf Garland
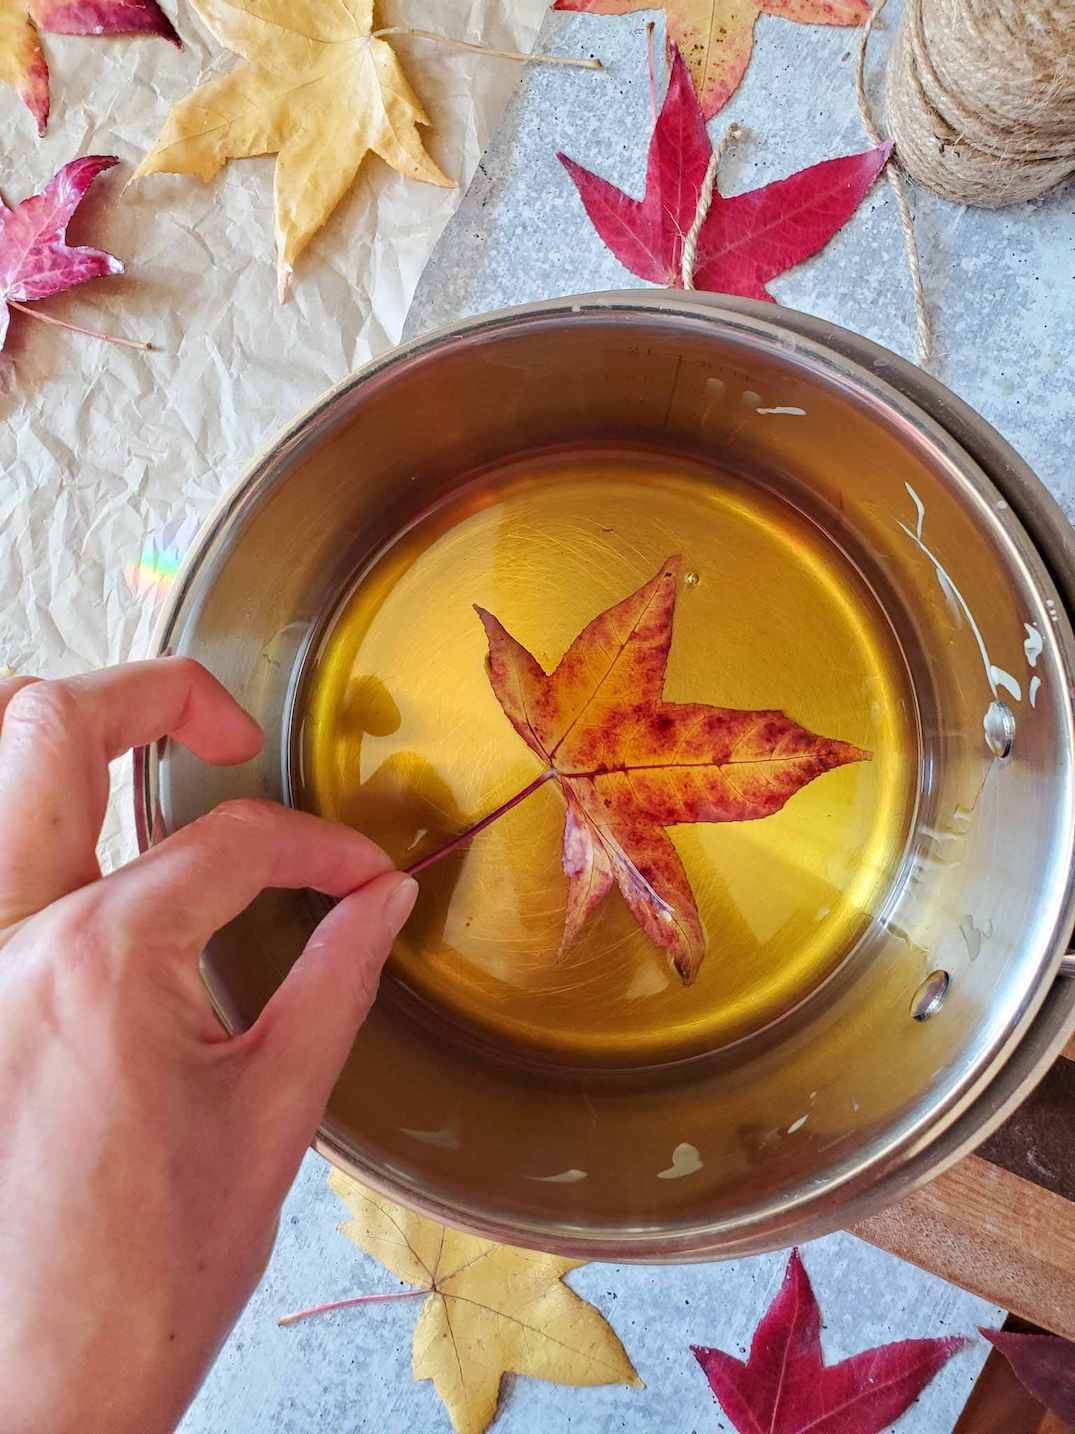
- Add beeswax to the very best portion of a double boiler, and with water throughout the lower pot, heat it on the stovetop over medium-high heat until the beeswax melts completely. Take away the wax from the heat, nonetheless preserve the water throughout the double boiler in case that you will need to reheat it.
- One after the opposite, dip the pressed leaves throughout the melted beeswax. Work quickly, nonetheless be sure the wax coats all parts of the leaf. Tip: Moreover dip a wonderful portion of the stem in wax now too. Will in all probability be easier to return and dip merely the remaining tip of the stem later.
- Preserve the leaf above the pot and offers it a fragile wiggle to let additional wax drip off. Then lay out the wax-dipped leaf flat on a bit of parchment paper or wax paper. Usually little chunks of wax will collect the place the leaf is touching the parchment paper, so it is likely to be biggest to place the leaves face-side-up to cowl these imperfections on the once more.

- As quickly as the entire leaves have been dipped and are dry, return and dip the remaining uncovered portion of stem in wax as properly. Avoid re-dipping the leaf though, or the extra wax layer will current.
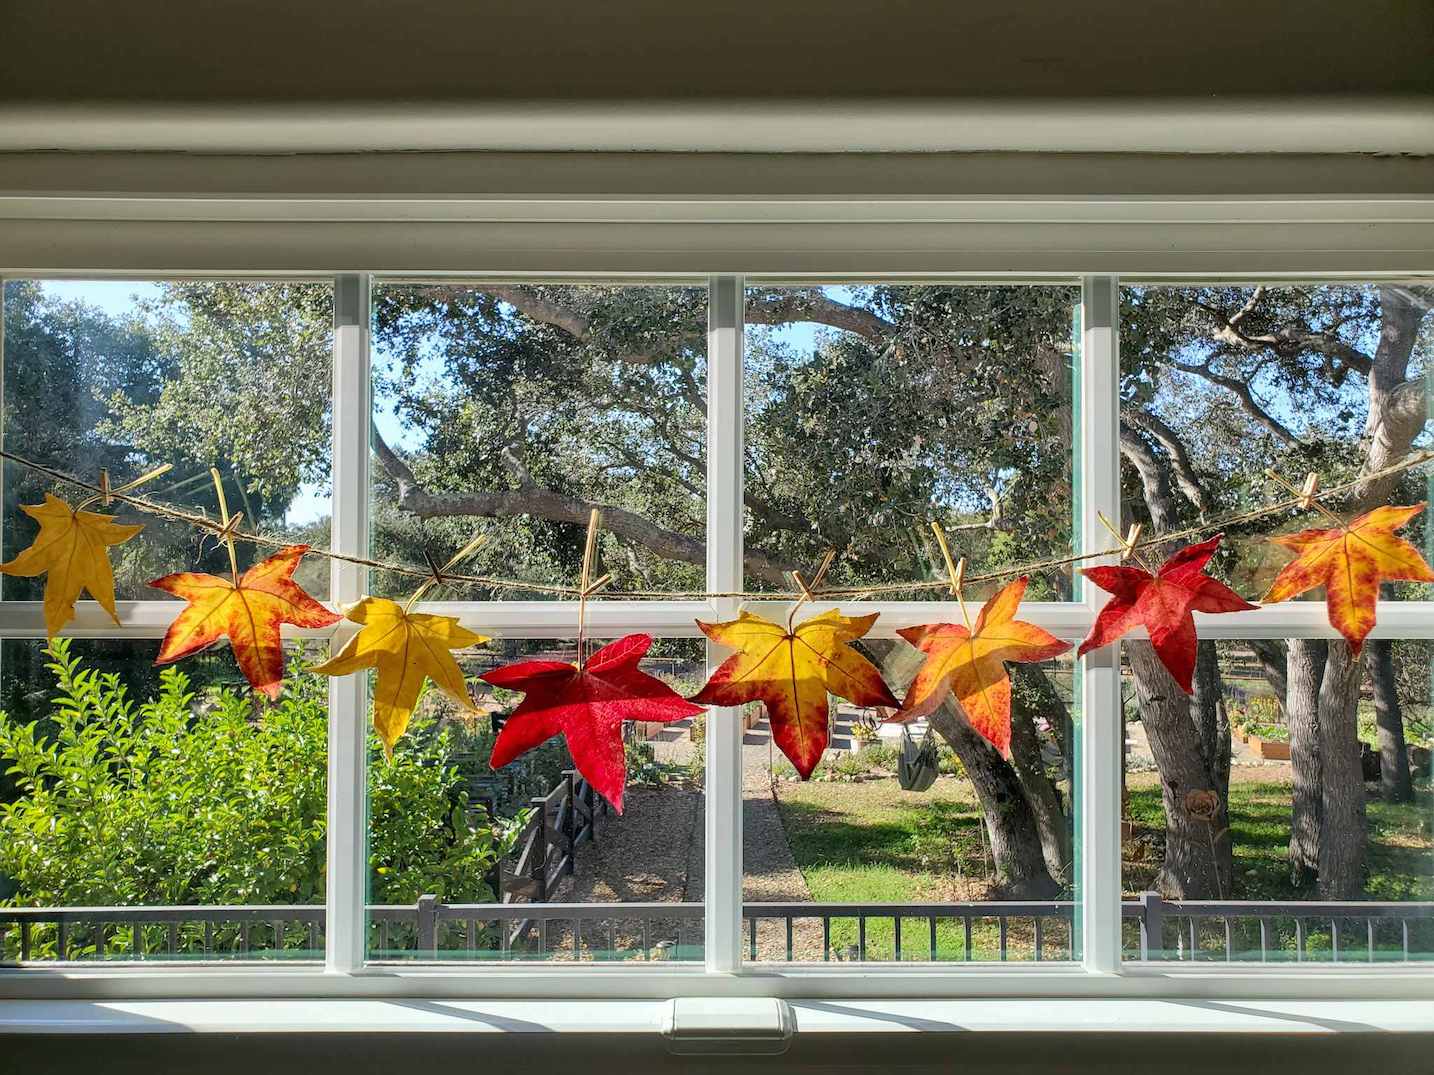
- After the entire waxed leaves are dry (they dry fast!), clip or tie them to twine to create a garland. It’s usually greatest to carry the twine the place you want it first after which join the leaves. Cluster the leaves shut collectively for an extra lush leaf garland, or maintain them additional sparsely for a straightforward, dainty look.
Fall leaf garlands look far more fantastic when backlit, akin to strung in a sunny window or pinned in entrance of twinkle lights. Mild truly makes the colors pop! If you happen to occur to don’t want to use tacks or nails, try these small suction window hooks.


How prolonged do waxed leaves closing?
Wax-dipped leaves must closing (retain color) for a lot of weeks, perhaps as a lot as just a few months. That talked about, we like to do this enterprise close to Halloween after which profit from the colorful wax leaf garland by Thanksgiving. If I make higher than I maintain, I save the extra waxed leaves in a darkish place as back-up so I can swap out any that fade faster than the others. As quickly as we’re completed with them, the waxed leaves are a welcome addition to our compost pile. (We don’t put them in our worm bin however.)
Completely different makes use of for beeswax leaves
Previous garlands, there are many beautiful and creative strategies to indicate waxed leaves for fall decor! Cluster the leaves in a bowl or unfold them out on the desk to create a centerpiece. Pinecones, acorns, and gourds make good waxed leaf companions! Tuck the waxed leaves proper right into a fall wreath, hanging cell, or fill a clear vase with them. You possibly can presumably even glue a magnet on the underside to adorn the fridge with fall aptitude.


And that’s how one can make a fall leaf garland.
Properly associates, I optimistic hope you’ll have merely as loads fulfilling creating your private fall wax leaf garlands as I do. Please let me know you in all probability have any questions throughout the suggestions beneath. Moreover tag me on Instagram so I can see your beautiful leaf garlands too! If you happen to occur to found this tutorial to be inspiring and useful, please ponder leaving a star evaluation beneath. Moreover, unfold the autumn love by pinning or sharing this publish. Happy leaf foraging and crafting!
You may also benefit from:

DIY Beeswax Fall Leaf Garland
Uncover methods to make a ravishing, pure fall beeswax leaf garland. It’s a fulfilling, simple, and sustainable autumn craft enterprise that the complete family can benefit from! Wax leaf garlands look beautiful strung all through a sunny window, fireplace mantle, or trailing alongside a banister.
- Leaves – choose fallen, flat, vibrant leaves that are not however curling or getting crispy
- Beeswax or vegan totally different, enough to create a shallow pool of wax (about 1/4 to 1/2-inch deep) throughout the pot as quickly as melted
- Jute twine, string or twinkle lights
- Double boiler
- Small clothespins
- Parchment paper or waxed paper
-
Press your collected leaves in a e-book for 24 to 48 hours sooner than you make your beeswax leaf garland.
-
Gently heat beeswax on the stovetop in a double-boiler.
-
As quickly because the wax has completely melted, quickly dip each leaf throughout the wax (one after the opposite) and assure all parts of the leaf have been coated. Dip a lot of the stem too.
-
Preserve the leaf over the pot of wax and evenly wiggle it, allowing additional wax to drip off
-
Lay waxed leaves out on parchment paper or waxed paper to dry. They dry fast; inside 10 minutes!
-
As quickly as dry, return and dip the uncoated solutions of the stems in wax (stay away from getting additional wax on the leaf). Allow to dry as soon as extra.
-
Use small clothespins to attach the waxes leaves to a bit of twine, string or twinkle lights to create a garland. (It’s best to carry the string the place you want it first, then join the leaves)
-
The leaves must retain their color for a lot of weeks, as much as some months.
-
Benefit from your beautiful do-it-yourself beeswax leaf garland!
-
For easy clean-up, re-heat the pot of beeswax, pour off any leftover wax to keep away from losing for an extra enterprise, wipe out the pot or pan with a paper towel, then wash properly with cleansing cleaning soap and scorching water.
